Last Updated: February 20, 2024
There’s nothing like relaxing in front of an authentic wood burning fireplace in the chilly fall and winter months. The soothing crackle and aroma of burning logs paired with the warmth of real, dancing flames instantly makes your home feel more inviting.
Unlike low-maintenance gas units, wood burning fireplaces require consistent upkeep to function safely. It’s important to ensure your wood burning fireplace stays free of excess ash and debris that can block essential components, as well as creosote buildup that may cause a chimney fire.
In addition to regular cleaning at home, you’ll also need to hire an NFI certified professional or local licensed contractor to clean and inspect your wood burning fireplace and chimney at least once a year. A professional will be able to safely disassemble and clean the components, check your chimney for damage, make sure your fireplace is venting properly, and fix any potential issues.
Below, we’ve listed seven simple steps you can follow in between inspections to keep your wood burning fireplace in great condition for as long as possible.
STEP 1: CLEAN THE INTERIOR OF YOUR FIREPLACE
Remove Old Ashes & Debris
Wood burning fireplaces can easily accumulate ashes and debris, especially if you use it regularly. It’s important to remove old ashes, debris, soot, and creosote buildup inside your fireplace. If left unchecked, these hazardous materials can cause a fire.
Pro Tip:
Creosote is a residue that is left over after wood burns, particularly logs that are not completely dry. It appears brown or black in color and often accumulates on the inner walls of your chimney. Creosote is extremely flammable, making it one of the major causes of chimney fires.
Wait at least 24 hours after using your wood burning fireplace to begin cleaning it. When it’s completely cool and safe to handle, remove all the ashes and dust from your firebox using a small shovel or hand broom and a dustpan.

Sweep off your fireplace grate or andirons, then remove them from your fireplace and place them on top of newspapers, a tarp, or an old bed sheet to protect your floors and furniture.
Instead of tossing your old ashes out right away, scoop them into a fire-resistant metal bucket and let them sit for at least three days to ensure they’re completely cool before discarding them in the trash.
Pro Tip:
Consider adding your old ashes to your garden. Ashes serve as a source of calcium, potassium, and other nutrients for plants that prefer low-acidity, high-pH soil.
Clean Your Fireplace Walls & Floor
Using a dry bristle brush or hand broom, sweep the ashes, soot, and dust off your fireplace walls, working from the top down, and place them in your fire-resistant metal bucket. You can also vacuum out your firebox to catch any remaining dust.
To remove stubborn soot spots and creosote buildup inside your fireplace, you’ll need to create a simple cleaning solution.
In a large bucket, mix:
- 3 tablespoons of trisodium phosphate (TSP)
- ½ cup of bleach
- 1 quart of hot water

Fill a spray bottle with your cleaning solution and generously spray your fireplace walls and floors. Let the solution sit for about five minutes, then spray the walls and floor again for scouring.
Scrub inside your fireplace with a stiff-bristled brush, starting at the top of the walls and working your way down to the floor.
After you’re done scrubbing, use old rags or paper towels to wipe away any leftover cleaning solution on the walls and floor of your fireplace.
Clean Your Fireplace Accessories
To clean your fireplace grate and andirons, apply a few teaspoons of dish detergent to a damp scrubbing brush, wet the grate or andirons, scrub them rigorously, and rinse them off with water. Repeat this process until all the soot is removed.
Dry your grate or andirons thoroughly with a clean, dry rag or paper towel before reassembling them in your fireplace.
STEP 2: MAKE SURE YOUR CHIMNEY HAS A CAP
Making sure your chimney functions properly is crucial to the longevity of your wood burning fireplace. Whether you have a masonry or metal chimney, you’ll need to check it regularly for cracks, dents, rust, and warping.
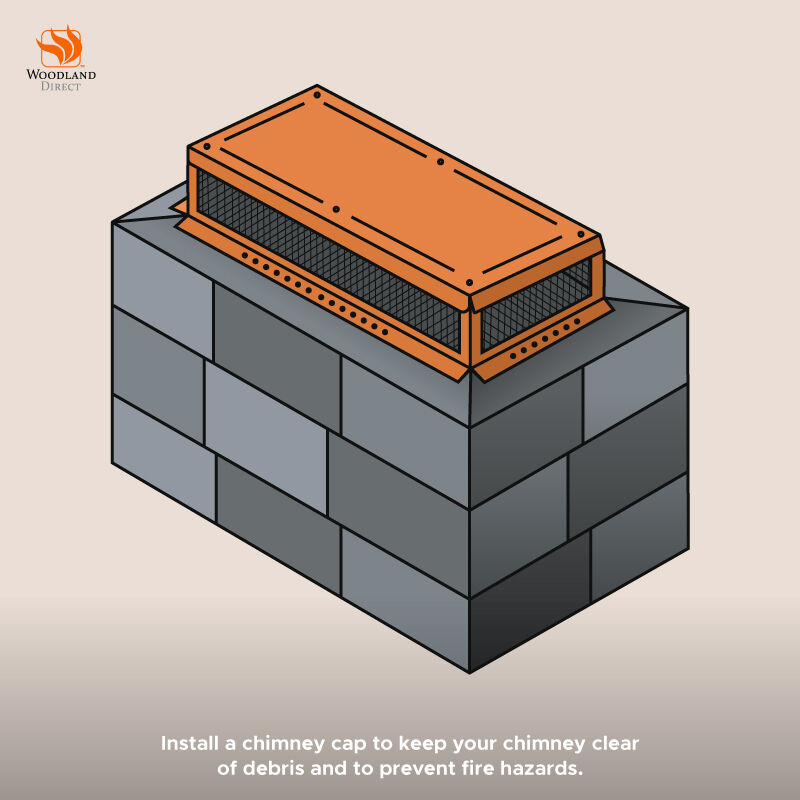
One of the simplest and most effective ways to maintain a well-functioning chimney is by installing a chimney cap. These protective coverings sit on top of your chimney crown and feature wire mesh sides to keep debris and small critters out of your chimney. They also prevent fire hazards by blocking sparks from floating up out of your chimney and onto the roof.

It’s important to inspect your chimney cap and screen regularly and replace them right away if you notice any signs of deterioration.
Please refer to our in-depth chimney cap measuring and installation guide to find the right style and fit for your home.
STEP 3: INSPECT YOUR FIREPLACE COMPONENTS
One of the most essential components of your wood burning fireplace is the damper, a vent inside of your chimney that must be opened to let air in when the fire is lit, then closed once the fire is extinguished to prevent drafts from entering your home.
Inspect your fireplace damper regularly, making sure that it opens and closes properly. If the damper is stuck closed, carbon monoxide and smoke will build up inside of your home, causing dangerous health and fire hazards.

To repair or replace a faulty fireplace damper, you’ll need to hire a licensed professional.
Wood burning fireplaces are also equipped with a cast iron ash dump, located on the floor, which allows cold ashes to be swept into an enclosed chamber below the firebox. This enclosed chamber is usually located in the fireplace foundation in your basement and features a small, removable metal door.
Empty out the ashes from this enclosed chamber routinely, especially if you use your fireplace often.
STEP 4: ADD SAFETY FEATURES TO YOUR FIREPLACE
Screens & Doors
To make your wood burning fireplace safer, more efficient, and easier to maintain, install a mesh screen or custom glass doors.
Screens and doors prevent sparks from popping out of your fireplace and landing on your floors or furniture. They also keep curious children and pets away from the flames and heat.

Frequently check the condition of your screen or doors for cracks, holes, rust, warping, dents, or any other signs of deterioration.
Find a screen that fits your fireplace perfectly with our simple screen measuring guide, or upgrade to custom glass doors with our fireplace doors measuring guide.
Heat Blowers
Installing a fan or blower inside your wood burning fireplace pushes more heat into your home and distributes warmth evenly around the room, helping you save on energy costs.

Smoke & Gas Detectors
A clogged chimney or damaged venting system may cause smoke and carbon monoxide, a colorless and odorless gas, to infiltrate your home.
It’s crucial to have both a smoke alarm and a carbon monoxide detector installed near your wood burning fireplace.

STEP 5: TEST THE FUNCTION OF YOUR FIREPLACE
After you’ve cleaned, inspected, and reassembled your wood burning fireplace, light a small piece of seasoned wood from the top down.
The smoke should rise vertically, exiting the chimney rather than entering your room.

If the smoke isn’t venting vertically, immediately extinguish the wood and troubleshoot any problems.
STEP 6: ONLY BURN SEASONED WOOD
Make sure the wood you’re burning in your fireplace is seasoned, meaning it has been cut down and dried out. Wood that is still green or too damp won’t create the large fires you’re looking for and will produce more creosote.

To determine if a piece of wood is too green to burn safely, gently knock it against another log. If it makes a dull thud, instead of a sharp crack, the wood is not seasoned and should not be used in your fireplace.
You can also use a moisture meter to confirm that your logs are seasoned. Wood is considered dry enough to burn safely when the moisture content falls between 17 and 20 percent.
Hardwoods that are properly seasoned, like oak, maple, and birch, produce more heat, burn longer, and won’t produce as much creosote as softwoods, such as cedar and pine.
Pro Tip:
Generally, wood logs should be dried for 6-12 months before they're safe to burn in your fireplace. Split your logs into smaller pieces to dry them out faster.
STEP 7: SCHEDULE AN ANNUAL FIREPLACE INSPECTION
While regularly cleaning and inspecting your wood burning fireplace at home keeps it functioning safely and efficiently, you’ll also need to hire a licensed professional to inspect and clean your chimney and wood burning fireplace components at least once a year.

Reach out to a local NFI certified professional or licensed general contractor who has experience servicing and cleaning wood burning fireplaces to schedule your annual inspection.
DOWNLOAD YOUR WOOD BURNING FIREPLACE MAINTENANCE GUIDE
To help you maintain your wood burning fireplace at home, we've created a printable e-book you can download and reference in between inspections!
WE’RE HERE TO HELP
Have more questions about how to care for your wood burning fireplace? We'd love to help! Call our team of NFI certified experts today at 800.919.1904.
MORE RESOURCES:
Looking to lower your heating costs? Find out how to increase the efficiency of your fireplace.
Add cozy, authentic ambiance to your home with our Top 5 Wood Burning Fireplaces.
Accurately measure your fireplace for a new set of doors with this simple guide.

